
Salar de Uyuni: Photographing Infinity Under Bol...
Imagine standing on the surface of another planet, surrounded by an endless white canvas under the most incredible night sky you've ever seen. That's Salar de Uyuni. The Uyuni Salt Flats photography tour offers an unparalleled experience for both amateur and professional photographers. As a travel photographer specializing in astrophotography, I recently embarked on a three-day jeep tour of Salar de Uyuni, Bolivia, and I’m here to share my experience capturing its magic. I'll delve into the best time for Salar de Uyuni astrophotography and how you can make the most of your visit. From equipment recommendations to logistical tips, consider this your guide to photographing the world's largest salt flat.
Viral Video Integration
- HOOK: Watch the time-lapse of the Milky Way rising over the vast, white expanse of Salar de Uyuni at night.
- SCENE: Daytime shot of me setting up a forced perspective shot using a miniature toy dinosaur on the salt flats.
- TWIST: Rapid zoom out, revealing my hands positioning the dinosaur and the vast emptiness around me.
Photography Gear & Challenges in Salar de Uyuni
Capturing the beauty of Salar de Uyuni, especially at night, requires careful planning and the right equipment. The Astrophotography gear for Salar de Uyuni needs to be reliable and adaptable to the harsh conditions. Here's what I brought along:
- Camera: Sony a7S III - This camera excels in low-light conditions, crucial for astrophotography.
- Lenses:
- Sony FE 16-35mm f/2.8 GM - A versatile wide-angle lens perfect for landscapes and capturing the vastness of the salt flats.
- Sigma 14mm f/1.8 Art - Ideal for capturing the Milky Way and expansive nightscapes.
- Rokinon 24mm f/1.4 - Another excellent option for astrophotography, offering a fast aperture for capturing more light.
- Sony FE 100-400mm f/4.5-5.6 GM OSS - Used for wildlife shots in the Eduardo Avaroa Andean Fauna National Reserve
- Tripod: Manfrotto Befree Advanced - A sturdy tripod is essential for long-exposure shots and time-lapses.
- Other Accessories: Multiple batteries (the cold drains them quickly), a circular polarizer filter (to reduce glare from the salt during the day), lens cleaning cloths (dust is a constant issue), and a remote shutter release.
The Sony a7S III, my go-to camera for capturing the breathtaking night sky in Salar de Uyuni, requires a sturdy tripod for those essential long exposures.
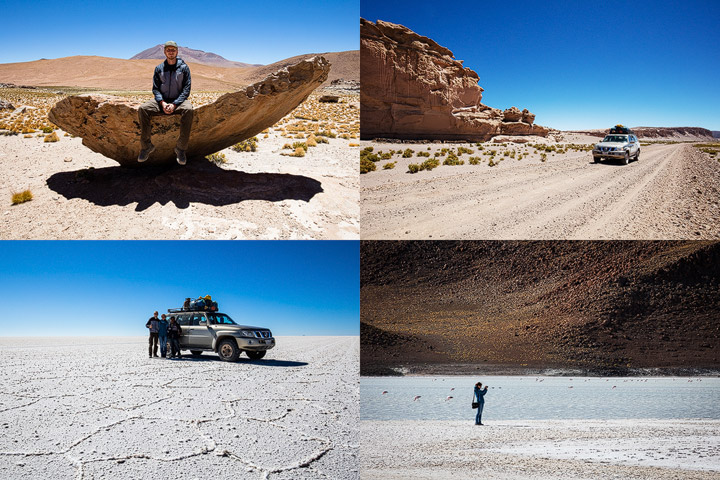
The challenges of photographing in Salar de Uyuni are numerous. The altitude (3,656 meters) can be physically demanding, and both you and your gear need to be prepared. Dust is a constant problem, so keep your lenses clean and protect your camera. Extreme temperature variations between day and night require layers of clothing and careful management of battery life. Make sure you know how to prepare for altitude sickness in Salar de Uyuni.
Three-Day Tour Highlights: A Photographer's Perspective
Day 1: Cementerio de Trenes (Train Cemetery)
The journey began at the Train Cemetery (Cementerio de Trenes), a surreal collection of rusted locomotives. The contrast of decaying metal against the stark white salt flats offers incredible photographic opportunities. I focused on finding unique angles, using foreground elements like rocks and salt formations to create interesting compositions.
This image, taken at a slight dutch angle, adds a sense of unease and highlights the decaying grandeur of the trains at the Cementerio de Trenes.
Tip: Don't be afraid to experiment with different perspectives. A wide-angle lens can exaggerate the scale of the trains, while a telephoto lens can isolate details. I even experimented with a dutch angle for this photo, giving the shot a somewhat unsettling tone.
Day 2: Isla Incahuasi (Incahuasi Island)
Day two took us to Incahuasi Island (Isla del Pescado), a rocky outcrop covered in giant cacti. The surreal contrast of these towering plants against the seemingly endless white expanse is truly breathtaking. This is where learning about Salar de Uyuni landscape photography tips really pays off.
I used leading lines, like paths and rock formations, to draw the viewer's eye into the frame. The rule of thirds is also crucial here; positioning the cacti off-center creates a more dynamic and visually appealing composition.
Day 3: Eduardo Avaroa Andean Fauna National Reserve
The final day was spent in the Eduardo Avaroa Andean Fauna National Reserve. My goal was to capture images of vicuñas and flamingos in their natural habitat. This requires patience and a deep respect for wildlife. Ethical wildlife photography means minimizing disturbance to the animals.

Using the Sony FE 100-400mm telephoto lens allowed me to capture these flamingos without disturbing their natural behavior.
I primarily used my Sony FE 100-400mm lens to capture these amazing creatures. This allowed me to maintain a safe distance and avoid stressing the animals.
Food Experiences on the Salar de Uyuni Jeep Tour
Venturing into Salar de Uyuni means experiencing local cuisine alongside the landscapes. One unique dish was llama steak, which I tried in a local village. The texture was slightly tougher than beef, with a gamey flavor. It was a far cry from my usual plant-based diet in Canada. I also got a glimpse of the preparation of quinoa soup, a staple in the Altiplano, and relied on coca tea to combat the effects of altitude sickness. Both offered nutritional benefits vital in this extreme environment. I would normally get my nutritional content from fresh produce, but I quickly learned fresh produce is scarce on the Altiplano.
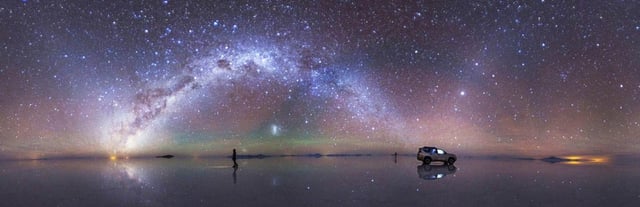
Landscape & Night Sky: A Photographer’s Dream
The landscape of Salar de Uyuni is unlike anything else on Earth. Photographing the stark white expanse without overexposing can be challenging. I used a circular polarizer to reduce glare and carefully adjusted my camera settings to avoid blowing out the highlights.
At night, Salar de Uyuni transforms into an astrophotographer's paradise. The lack of light pollution and the high altitude provide unparalleled stargazing opportunities. Capturing the Milky Way requires long exposure times, a wide aperture, and low ISO settings. Noise reduction techniques in post-processing using Adobe Lightroom and Starry Landscape Stacker are also essential. Salar de Uyuni likely rates as a Bortle class 1 location.
Perspective Photography: Playing with Scale
The vastness of Salar de Uyuni makes it perfect for forced perspective photography. This technique involves using foreground elements to create illusions of scale. By positioning a small toy dinosaur close to the camera and a person far away, I could make the dinosaur appear enormous. Precise positioning is key to creating a convincing illusion.
This behind-the-scenes shot captures the setup involved in creating a forced perspective image on the Uyuni Salt Flats.
Logistics & Tips for your Salar de Uyuni Astrophotography Tour
- Booking Tours: Book a Salar de Uyuni photography tour well in advance, especially during peak season. Vistalocation.com offers a range of tour options to suit different budgets and interests.
- What to Pack: Warm clothes (layers are best), sunscreen (the sun is intense at high altitude), sunglasses (the reflected sunlight is blinding), a hat, and comfortable walking shoes.
- Altitude Sickness: Acclimatize to the altitude before starting your tour. Drink plenty of water, avoid alcohol, and consider taking coca tea.
- Respect the Environment: Leave no trace. Pack out all your trash and avoid disturbing the wildlife. Also be sure to protect yourself. The sun will reflect off the salt flats and cause sunburn quickly.
Conclusion: Experience the Magic
Salar de Uyuni is a truly unique and unforgettable destination. Whether you're an experienced astrophotographer or a beginner, the opportunity to photograph this surreal landscape under the stars is an experience you won't want to miss. Book your tour through vistalocation.com and prepare to be amazed! Don't forget to check out my work on Instagram @marcopolo.pictures for more inspiration!