
Ice Climbing in the Canadian Rockies - Conquerin...
The Canadian Rockies, a majestic landscape of towering peaks and pristine valleys, transform into a winter wonderland offering a unique and exhilarating challenge: ice climbing. This isn't just about scaling rock; it's about ascending frozen waterfalls, a test of skill, strength, and nerve. This guide will take you through the fundamentals of ice climbing in Johnston Canyon and Grotto Canyon, Alberta, arming you with the knowledge you need to experience this incredible winter activity safely and confidently.
Johnston Canyon and Grotto Canyon: Ice Climbing Paradises
Alberta's Johnston Canyon and Grotto Canyon are renowned for their accessible and stunning ice formations, making them ideal locations for both beginners and experienced climbers. Johnston Canyon, with its frozen waterfalls cascading down the canyon walls, provides a breathtaking backdrop for your ice climbing adventure. Grotto Canyon offers a more secluded and intimate climbing experience, with unique ice formations tucked away within its narrow passageways.
Johnston Canyon: A Beginner's Dream
Johnston Canyon is particularly well-suited for those new to ice climbing. The Lower Falls route (WI2) is a fantastic starting point, offering a relatively gentle slope and easily accessible ice. It’s a great place to learn the basics of front-pointing and using ice axes.
Grotto Canyon: A Step Up in Challenge
Grotto Canyon presents a slightly more challenging experience, with routes like Grotto Falls (WI3) demanding greater technical proficiency. This canyon’s narrower confines and varied ice structures offer a more immersive and rewarding climb for those with some prior experience.
Essential Gear for Ice Climbing
Before venturing onto the ice, it's crucial to have the right gear. Here's a breakdown of the essentials:
- Ice Axes: The primary tool for ascending ice, ice axes come in various shapes and sizes. For beginners, a slightly curved axe with a comfortable grip is recommended.
- Crampons: These spiky attachments for your boots provide the necessary traction on ice. Look for adjustable crampons that fit securely on your climbing boots.
- Helmet: Protect your head from falling ice or accidental falls. A climbing-specific helmet is designed to absorb impact.
- Harness: A climbing harness provides a secure attachment point for ropes and other safety equipment.
- Climbing Boots: Stiff-soled, insulated climbing boots are essential for warmth and support.
- Warm Clothing: Dress in layers to stay warm and dry in the cold mountain environment. Waterproof and windproof outer layers are a must.
- Gloves: Insulated and waterproof gloves are critical for maintaining dexterity and warmth.
- Ice Screws: Used for creating secure anchor points in the ice.
- Belay Device: Used to safely manage the rope and control the climber's descent.
- Locking Carabiners: Used to connect different pieces of equipment securely.
Basic Ice Climbing Techniques
Mastering the fundamental techniques is essential for a safe and enjoyable ice climbing experience.
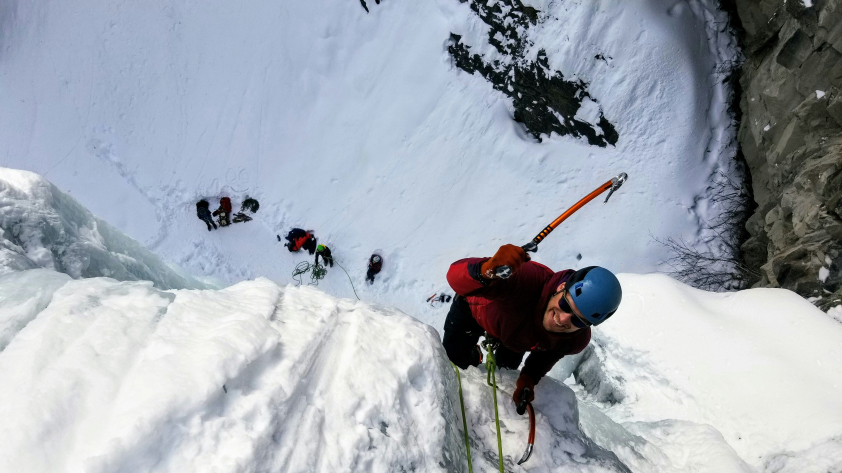
Front-Pointing
Front-pointing involves using the front points of your crampons to kick into the ice, creating a stable foothold. This technique requires precision and power.
- Foot Placement: Aim for a solid, level placement of your crampon points.
- Ankle Flexion: Flex your ankle to drive the points deep into the ice.
- Body Positioning: Keep your body weight centered over your feet for balance.
Using Ice Axes
Ice axes are used to create secure handholds and provide upward momentum.
- Axe Placement: Swing the axe with a controlled motion, aiming for solid ice.
- Grip: Maintain a firm grip on the axe, using your wrist and arm to generate power.
- Body Positioning: Keep your body close to the ice to minimize strain.
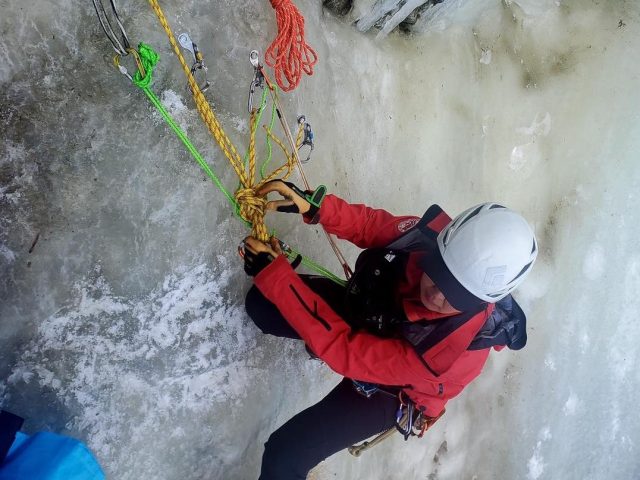
Ice Screw Placement
Placing ice screws correctly is paramount for safety.
- Choose a solid ice formation: Look for thick, dense ice free from cracks or air pockets.
- Prepare the placement: Clear away any loose snow or ice from the surface.
- Start the screw: Angle the screw slightly upwards and begin turning it into the ice with a smooth, continuous motion.
- Continue screwing: Keep applying consistent pressure until the screw is fully inserted.
- Clip in: Attach a carabiner and quickdraw to the screw and clip in the rope.

Safety Considerations
Ice climbing, while incredibly rewarding, carries inherent risks. Prioritize safety by following these guidelines:
- Ice Thickness: Ensure the ice is sufficiently thick and stable before climbing. Consult with experienced climbers or guides for current conditions.
- Avalanche Awareness: Be aware of avalanche hazards, especially on steeper slopes. Check avalanche forecasts and avoid climbing in avalanche-prone areas.
- Weather Conditions: Monitor weather forecasts and avoid climbing in extreme cold, high winds, or heavy snowfall.
- Proper Gear: Use well-maintained and appropriate gear for ice climbing.
- Climbing with a Partner: Never climb alone. Always climb with a knowledgeable and experienced partner who can provide assistance and belay.
- Communication: Establish clear communication signals with your partner.
- Emergency Plan: Have a plan in place in case of an accident or emergency.
Technology to Enhance Your Experience
Leverage technology to improve safety and efficiency:
FATMAP: Terrain Visualization and Route Planning
The [FATMAP app](AFFILIATE LINK to premium subscription) is an invaluable tool for terrain visualization and route planning. It provides detailed 3D maps of mountain areas, allowing you to analyze slope angles and identify potential avalanche terrain. You can use FATMAP to:
- Visualize slope angles: Identify steep slopes that may be prone to avalanches.
- Plan your route: Map out your ascent and descent routes, considering potential hazards.
- Access offline maps: Download maps for offline use, ensuring you have access to critical information even without cell service.
Book a Guided Tour
For beginners, the safest and most effective way to experience ice climbing is with a guided tour. Yamnuska Mountain Adventures (AFFILIATE LINK) offers exceptional guided ice climbing tours in Johnston Canyon and Grotto Canyon. Their experienced guides will provide you with the necessary instruction, gear, and safety guidance to ensure a memorable and safe adventure. Book your [Johnston Canyon Icewalk tour](AFFILIATE LINK) today!
Conclusion
Ice climbing in the Canadian Rockies is an unparalleled adventure, challenging you physically and mentally while rewarding you with breathtaking views and a sense of accomplishment. By understanding the essential techniques, prioritizing safety, and utilizing available technology, you can embark on an unforgettable journey into the heart of winter's frozen beauty. Gear up, get out there, and conquer those frozen waterfalls!
Hut-to-Hut Hiking in the Swiss Alps: The Bernese Oberland Traverse
Imagine trekking through the heart of the Swiss Alps, surrounded by towering peaks, pristine meadows, and the rhythmic clanging of cowbells. A hut-to-hut hike along the Bernese Oberland Traverse is an immersive journey into the soul of Switzerland, a multi-day adventure that combines breathtaking scenery with the challenge of alpine hiking. This narrative will guide you through a 4-day trek, highlighting the iconic views, charming mountain huts, and unforgettable moments that define this classic Swiss experience.
Grindelwald: The Starting Point
Our journey begins in Grindelwald, a picturesque village nestled at the foot of the Eiger. This vibrant town, with its charming chalets and bustling atmosphere, serves as the perfect launchpad for our alpine adventure. Before setting off, take a moment to soak in the views of the iconic Eiger North Face, a symbol of mountaineering challenge and triumph.

Day 1: Grindelwald to Kleine Scheidegg
The first day's hike takes us from Grindelwald to Kleine Scheidegg, a scenic mountain pass offering panoramic views of the Eiger, Mönch, and Jungfrau. The trail winds through lush meadows, gradually ascending towards the pass. As we climb, the air grows crisp and the views become increasingly spectacular.
- Highlights: The stunning views of the Eiger North Face, the charming alpine meadows, and the sense of accomplishment as you reach Kleine Scheidegg.
Day 2: Kleine Scheidegg to Männlichen
Day two is a relatively shorter hike from Kleine Scheidegg to Männlichen. The trail is mostly flat, providing ample opportunity to soak in the surrounding scenery. From Männlichen, enjoy the panoramic views of the Lauterbrunnen Valley and the surrounding peaks.
- Highlights: Gentle terrain, incredible views of the Lauterbrunnen Valley, and the opportunity to relax and enjoy the alpine scenery.
Day 3: Männlichen to Berghaus Alpiglen
This descent leads to the picturesque Berghaus Alpiglen. The hike is moderately challenging, with some steep sections. As we descend, the views open up, revealing the dramatic landscapes of the valley below. Berghaus Alpiglen offers a cozy and welcoming atmosphere, a perfect place to rest and recharge after a day of hiking. You might even catch a glimpse of cows grazing peacefully nearby. [Swiss Alpine Club](AFFILIATE LINK) directs you to the hut reservation page.
- Highlights: Steep descents, views of the valley, Berghaus Alpiglen, which provides a unique mountain experience.
Day 4: Berghaus Alpiglen to Lauterbrunnen
The final day's hike takes us from Berghaus Alpiglen to Lauterbrunnen, a charming village nestled in the heart of the Lauterbrunnen Valley. The trail descends steeply through forests and meadows, offering breathtaking views of the valley's iconic waterfalls. Lauterbrunnen, with its dramatic cliffs and cascading waterfalls, is a fitting end to our alpine adventure.
- Highlights: Stunning waterfall views, decent into Lauterbrunnen Valley, completion of the traverse.
Staying in Mountain Huts
One of the most unique aspects of hut-to-hut hiking is the experience of staying in mountain huts. These rustic accommodations provide a warm and welcoming refuge for hikers, offering comfortable beds, hearty meals, and a sense of camaraderie. Staying in huts like Berghaus Alpiglen and Hotel Bellevue des Alpes is an integral part of the Bernese Oberland Traverse experience.

Encounters and Challenges
Throughout our trek, we encountered fellow hikers from all corners of the globe, each with their own stories and motivations. Sharing experiences and exchanging tips with fellow travelers added a unique dimension to our journey. Of course, the trek also presented its challenges, from steep ascents and descents to unpredictable weather. Overcoming these challenges, however, made the experience all the more rewarding.
Technology for Navigation
While the trails are well-marked, having a reliable navigation tool is essential.
Gaia GPS: Offline Navigation and Route Tracking
[Gaia GPS](AFFILIATE LINK to premium subscription) is a powerful tool for offline navigation and route tracking. It allows you to download maps, create custom waypoints, and track your progress even without cell service. With Gaia GPS, you can:
- Download maps: Access detailed topographic maps of the Bernese Oberland.
- Create waypoints: Mark important locations, such as water sources or viewpoints.
- Track your route: Monitor your progress and ensure you're staying on track.
Book Your Accommodation
Plan your stay in the huts along the Bernese Oberland Traverse. The [Swiss Alpine Club](AFFILIATE LINK) manages many of these huts, and you can book accommodation through their website. Reserve your spots early, especially during peak season.
Conclusion
The Bernese Oberland Traverse is more than just a hike; it's an immersive journey into the heart of the Swiss Alps. From the iconic views of the Eiger, Mönch, and Jungfrau to the charming mountain huts and the challenges of alpine hiking, this trek offers an unforgettable experience. So, pack your boots, grab your backpack, and prepare to be captivated by the beauty and majesty of the Swiss Alps.
Wildlife Photography in Yellowstone's Lamar Valley - Capturing the Spirit of the American Serengeti
Yellowstone National Park's Lamar Valley, often dubbed "America's Serengeti," is a wildlife photographer's paradise. This vast expanse of grasslands and sagebrush is home to a stunning array of animals, from bison and elk to wolves and grizzly bears. Capturing the spirit of this wild landscape requires patience, skill, and a deep respect for the animals that call it home. This guide will provide you with the tips and techniques you need to create breathtaking wildlife photographs in Yellowstone's Lamar Valley.
The Lamar Valley: A Wildlife Hotspot
The Lamar Valley's unique ecosystem supports a diverse range of wildlife, making it a prime location for photography. The open landscape allows for easy spotting of animals, and the relatively flat terrain makes it accessible to photographers of all skill levels.
Animals to Photograph
The Lamar Valley is home to a variety of iconic American wildlife, providing endless photographic opportunities.
- Bison: These massive herbivores are a common sight in the Lamar Valley. Photograph them grazing in the grasslands or crossing the Lamar River.
- Wolves: The Lamar Valley is famous for its wolf packs. Capturing images of wolves requires patience and a good telephoto lens.
- Elk: These majestic creatures are often seen grazing in meadows or browsing in forests.
- Pronghorn: These swift animals are known for their incredible speed. Capture them running across the open grasslands.
- Grizzly Bears: While sightings are less frequent, grizzly bears roam the Lamar Valley. Always maintain a safe distance and use a long telephoto lens.
Camera Settings for Wildlife Photography
Using the right camera settings is crucial for capturing sharp, well-exposed images of moving animals.
- Aperture: Use a wide aperture (e.g., f/2.8 or f/4) to create a shallow depth of field, blurring the background and isolating your subject.
- Shutter Speed: Use a fast shutter speed (e.g., 1/500th of a second or faster) to freeze the motion of moving animals.
- ISO: Adjust your ISO to achieve a proper exposure in varying lighting conditions. Keep the ISO as low as possible to minimize noise.
Ethical Wildlife Photography Practices
It's essential to practice ethical wildlife photography, respecting the animals and their habitat.
- Maintain Distance: Keep a safe distance from wildlife. Use a telephoto lens to get close-up shots without disturbing the animals.
- Avoid Disturbance: Do not approach animals, make loud noises, or do anything that might stress them.
- Respect Boundaries: Stay on designated trails and roads. Avoid entering sensitive areas.
- Do Not Feed Wildlife: Feeding animals can alter their natural behavior and make them dependent on humans.
Optimal Times of Day for Photography
The best times of day for wildlife photography are dawn and dusk, when the light is soft and golden.
- Dawn: The early morning light provides a warm, inviting glow, and animals are often more active at this time.
- Dusk: The evening light creates dramatic shadows and silhouettes, adding depth and emotion to your images.
Equipment Recommendations
Having the right equipment is essential for successful wildlife photography.
- Telephoto Lens: A telephoto lens is a must for capturing close-up images of wildlife from a safe distance.
- Tripod: A tripod provides stability, especially when using long telephoto lenses.
- Camera Bag: A comfortable and durable camera bag is essential for carrying your gear.
- Binoculars: Binoculars are useful for spotting wildlife from a distance.
Rent Your Equipment
If you don't own a telephoto lens, consider renting one from [Lensrentals.com](AFFILIATE LINK). They offer a wide selection of high-quality lenses at affordable prices. Check out their [telephoto lens rental page](AFFILIATE LINK) for more information.
Predicting Weather Conditions
The [Dark Sky app](AFFILIATE LINK to premium subscription) is a valuable tool for predicting weather conditions and sunrise/sunset times. It provides accurate and detailed forecasts, allowing you to plan your photography sessions accordingly. Use it to prepare the best way to capture incredible wildlife photos!
Conclusion
Wildlife photography in Yellowstone's Lamar Valley is a rewarding experience that allows you to connect with nature and capture the beauty of the American West. By following these tips and techniques, you can create stunning images that showcase the spirit of this remarkable landscape. Remember to always prioritize the safety and well-being of the animals, and practice ethical photography habits.