Descending into the Earth: Conquering Zion's Sub...
The Subway in Zion National Park is more than just a hike; it's an immersive journey into a sculpted sandstone canyon, a cathedral of natural artistry carved by the relentless flow of water. This technical canyoneering route demands respect, preparation, and a healthy dose of adventure spirit. It's not for the faint of heart, but for experienced adventurers seeking a truly unforgettable experience, descending into the Subway is a pilgrimage worth undertaking. This guide will provide you with everything you need to know to tackle this incredible canyon, from securing permits to mastering the necessary skills and embracing "leave no trace ethics."
Securing Your Passage: Permits and Reservations
Venturing into the Subway requires a permit, and obtaining one is a crucial first step. The National Park Service NPS website manages a lottery system for both hiking from the top-down (technical canyoneering) and bottom-up (non-technical hike). The top-down route requires technical gear and skills, while the bottom-up is a strenuous but non-technical hike to the Subway's iconic chamber. Demand is high, especially during peak season, so plan and apply well in advance. Remember to familiarize yourself with all permit regulations and closures before applying. Winning the lottery is only the beginning; you must then accept the permit and abide by all NPS guidelines.
Gearing Up for the Descent: Essential Equipment
The Subway demands specific gear to ensure safety and success. Don’t skimp on quality or preparedness; your life could depend on it.
- Wetsuit: A 5mm neoprene wetsuit like the NRS Hydroskin is essential for staying warm in the chilly water. The Subway's pools are cold year-round.
- Canyoneering Boots: Invest in durable canyoneering boots with excellent grip, such as the Five Ten Canyoneer 3. These provide ankle support and sticky rubber soles for navigating slippery terrain.
- Waterproof Backpack: A waterproof backpack like the Sea to Summit Hydraulic Dry Pack is crucial for keeping your gear dry. Choose a size appropriate for your trip length and gear load.
- Rope: A 60-meter static rope, such as the Sterling CanyonTech, is necessary for the rappels. Ensure the rope is in good condition and rated for canyoneering.
- Harness: A canyoneering specific harness, like the Petzl Canyon Club, is ideal.
- Rappel Device: An ATC (air traffic controller) or figure eight descender.
- Helmet: A climbing helmet rated for impact protection.
- Headlamp: Essential for navigating dark sections of the canyon.
- Dry Bags: Additional dry bags to protect electronics and sensitive items inside your waterproof backpack.
Canyoneering specific gear, like the harness and boots shown here, are critical for safe navigation through challenging canyons like Zion's Subway. Prioritizing specialized gear ensures that you're adequately equipped to handle the unique demands of the route.
Navigating the Subterranean World: Route Description
The top-down Subway route is approximately 9.5 miles long and involves several rappels, the tallest of which is about 50 feet. The hike begins at the Wildcat Canyon Trailhead and descends into Russell Gulch before entering the Subway.
- Wildcat Canyon Trailhead: Begin at the trailhead (GPS: 37.3214° N, 113.0618° W). Follow the trail down into Russell Gulch.
- First Rappel: The first rappel is usually the longest. Carefully set up your anchor and descend.
- The Subway Chamber: After several more rappels and swims, you'll reach the iconic Subway chamber, with its sculpted walls and emerald pools.
- Final Descent: Continue downstream, navigating several more obstacles and rappels.
- Exit: The route ends at the Left Fork Trailhead (GPS: 37.3482° N, 113.0865° W).
Mastering the Skills: Essential Canyoneering Techniques
The Subway requires a range of canyoneering skills to navigate safely:
- Anchor Building: Proficiency in building solid and reliable anchors is paramount. Learn to evaluate rock quality and use appropriate webbing and hardware. Consider taking a course on anchor building.
- Rappelling: Master various rappelling techniques, including using an ATC or figure eight descender. Practice smooth and controlled descents.
- Swiftwater Rescue Basics: Understanding basic swiftwater rescue techniques is crucial, as you'll be wading and swimming in moving water. Know how to self-rescue and assist others.
- Knots: Learn to tie essential knots for canyoneering, such as the figure-eight follow-through, the water knot, and the autoblock.
Respecting the Sanctuary: Leave No Trace Ethics
The Subway is a fragile and pristine environment. It is vital to adhere strictly to "leave no trace ethics" to minimize your impact.
- Pack Out All Waste: Pack out everything you pack in, including food wrappers, toilet paper, and human waste. Use a WAG bag if necessary.
- Minimize Impact: Stay on established trails and avoid trampling vegetation. Be careful not to damage the delicate ecosystem.
- Leave What You Find: Do not remove or disturb any natural objects, such as rocks, plants, or artifacts.
- Respect Wildlife: Observe wildlife from a distance and avoid feeding them.
- Be Considerate of Others: Minimize noise and allow others to enjoy the serenity of the Subway.

Following leave-no-trace principles when canyoneering, as demonstrated here, protects delicate ecosystems and ensures future adventurers can experience pristine environments. Minimize your impact to preserve natural wonders.
Embark on Your Subterranean Adventure
Descending into the Subway is an experience unlike any other. With proper preparation, skills, and respect for the environment, you can safely navigate this incredible canyon and create lasting memories. For expert instruction and safety guidance, consider booking a guided canyoneering trip with Zion Adventures Company. The Subway awaits – are you ready to descend?
The Haute Route: A Mountaineering Odyssey from Chamonix to Zermatt
The Haute Route, or "High Route," is a legendary trek connecting the mountaineering meccas of Chamonix, France, and Zermatt, Switzerland. This challenging and rewarding journey traverses the heart of the Alps, offering breathtaking views of snow-capped peaks, glaciers, and iconic mountains like Mont Blanc and the Matterhorn. It's not just a hike; it's a mountaineering odyssey that demands fitness, skill, and a deep appreciation for the alpine environment. This guide provides a complete overview of planning and executing this extraordinary trek.
Planning Your Alpine Crossing: Daily Stages and Accommodation
The Haute Route typically takes 12-14 days to complete, covering approximately 200 kilometers (125 miles) with significant elevation gain. Each day presents its own challenges and rewards.
- Stage 1: Chamonix to Argentière: A relatively easy start, acclimatizing to the altitude. (Distance: 8 km, Elevation Gain: 400m, Difficulty: Easy)
- Stage 2: Argentière to Refuge Albert Premier: Ascend to the glacier with stunning views of Mont Blanc. (Distance: 10 km, Elevation Gain: 900m, Difficulty: Moderate)
- Stage 3: Refuge Albert Premier to Champex: Crossing the Col du Tour. (Distance: 15 km, Elevation Gain: 500m, Difficulty: Moderate)
- Stage 4: Champex to Cabane d'Orny: Traverse the valleys and ascend again towards the high alpine. (Distance: 12 km, Elevation Gain: 700m, Difficulty: Moderate)
- Stage 5: Cabane d'Orny to Cabane de Valsorey: Ascend to the Plateau du Couloir and continue towards the cabane. (Distance: 8 km, Elevation Gain: 800m, Difficulty: Moderate)
- Stage 6: Cabane de Valsorey to Bourg-St-Pierre: Descending into the valley (Distance: 10 km, Elevation Loss: 1500m, Difficulty: Moderate)
- Stage 7: Bourg-St-Pierre to Cabane de Chanrion: Ascending across the valley and up to the cabin. (Distance: 15 km, Elevation Gain: 1500m, Difficulty: Hard)
- Stage 8: Cabane de Chanrion to Cabane des Vignettes: Glacier crossing (Distance: 12 km, Elevation Gain: 1100m, Difficulty: Hard)
- Stage 9: Cabane des Vignettes to Cabane Bertol: Challenging glacier ascent and traverse. (Distance: 10 km, Elevation Gain: 800m, Difficulty: Hard)
- Stage 10: Cabane Bertol to Zermatt: Descending towards Zermatt. (Distance: 14 km, Elevation Loss: 1600m, Difficulty: Moderate)
Accommodation:
- Refuges: Mountain refuges like Refuge du Couvercle and Cabane du Mont Fort offer basic but comfortable accommodation, including meals and dorm-style sleeping arrangements. Booking well in advance is essential, especially during peak season.
- Valley Hotels: In villages like Chamonix and Zermatt, you'll find a range of hotels to suit all budgets.
Equipping for the Heights: Essential Mountaineering Gear
The Haute Route demands specific mountaineering gear to navigate glaciers, snowfields, and rocky terrain safely.
- Ice Axe: An ice axe like the Black Diamond Raven Pro is crucial for self-arrest and balance on steep slopes.
- Crampons: Crampons such as the Grivel G12 provide traction on ice and snow. Ensure they fit your mountaineering boots properly.
- Mountaineering Boots: Sturdy mountaineering boots like the La Sportiva Nepal Evo GTX offer ankle support, insulation, and compatibility with crampons.
- Harness: A lightweight climbing harness like the Petzl Adjama is necessary for glacier travel and crevasse rescue.
- Avalanche Safety Kit: Transceiver, shovel, and probe are essential for safe glacier travel. The BCA Tracker4 avalanche transceiver is a popular choice.
Mastering the Mountains: Required Skills and Training
The Haute Route requires a range of mountaineering skills. It is vital to practice, learn, and build experience.
- Ice Axe Arrest Technique: Knowing how to stop a fall with your ice axe is crucial. Practice this technique extensively before your trek.
- Crevasse Rescue Skills: Learn how to perform a crevasse rescue using ropes, pulleys, and prusiks. Consider taking a training course offered by Alpine Ascents International.
- Navigation with Map and Compass: While GPS devices can be helpful, knowing how to navigate with a map and compass is essential in case of electronic failure.
- Avalanche Transceiver Training: Understanding how to use an avalanche transceiver, shovel, and probe is critical for glacier travel.
- Mountain Weather Forecasting: Learn to interpret mountain weather forecasts and recognize signs of changing conditions. Several apps and websites provide mountain-specific weather information.
Weather the Storm: Mountain Weather Forecasting
Mountain weather can change rapidly. Be prepared for unpredictable conditions.
- Understand Weather Patterns: Learn to identify common weather patterns in the Alps and how they affect conditions on the Haute Route.
- Monitor Forecasts Regularly: Check multiple weather sources daily, including local forecasts and high-altitude weather reports.
- Recognize Warning Signs: Be aware of visual cues like approaching clouds, changes in wind direction, and temperature drops.
- Be Prepared to Adjust Plans: If the weather turns bad, be willing to modify your itinerary or turn back.
Join the Adventure
The Haute Route is a challenging but incredibly rewarding trek that will test your limits and leave you with memories to last a lifetime. For logistical support and expert guidance, consider signing up for a guided Haute Route trek with Mountain Trip. Are you ready to embark on this alpine adventure?
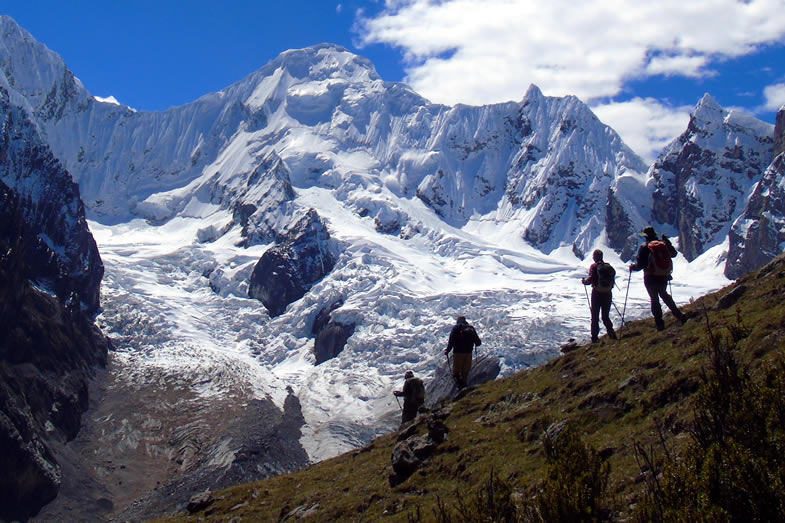
Wild and Untamed: Trekking the Cordillera Huayhuash in Peru
The Cordillera Huayhuash, nestled in the Peruvian Andes, is a hidden gem for experienced trekkers seeking a challenging and awe-inspiring adventure. This remote mountain range boasts towering snow-capped peaks, turquoise glacial lakes, and dramatic landscapes that rival any in the world. Unlike the more popular Inca Trail, the Huayhuash offers a raw, untamed wilderness experience, demanding respect and preparation. This guide will help you plan your trek, from obtaining permits to acclimatizing to the high altitude and minimizing your environmental impact.
Charting Your Course: Permits, Guides, and Circuits
Trekking in the Cordillera Huayhuash requires careful planning.
- Permits: Permits are required to trek in the Huayhuash. These are typically purchased from local communities along the route.
- Guides and Porters: Hiring a local guide and/or porters is highly recommended, especially if you're not an experienced high-altitude trekker. They can provide invaluable assistance with navigation, logistics, and cultural understanding.
- Trekking Circuits: The classic Huayhuash trek is an 8-12 day loop, but shorter and longer options are available. The most popular route starts and ends in the village of Llamac.
Conquering the Altitude: Acclimatization Strategies
Altitude sickness is a serious concern when trekking in the Huayhuash. Proper acclimatization is crucial.
- Pre-Acclimatization: Spend several days in Huaraz (3,050m / 10,000ft) before starting your trek. This allows your body to adjust to the altitude.
- Acclimatization Hikes: Take several acclimatization hikes around Huaraz, gradually increasing in altitude.
- Ascend Slowly: Ascend gradually during your trek, allowing your body time to adjust to the increasing altitude.
- Stay Hydrated: Drink plenty of water.
- Avoid Alcohol and Caffeine: These can dehydrate you and worsen altitude sickness.
- Listen to Your Body: If you experience symptoms of altitude sickness, descend to a lower altitude immediately.
Gearing Up for the Challenge: Essential Equipment
The Huayhuash trek demands specific gear to cope with the high altitude and challenging terrain.
- High-Altitude Sleeping Bag: A high-altitude sleeping bag like the Western Mountaineering UltraLite is essential for staying warm at night.
- Trekking Poles: Trekking poles like the Leki Makalu Lite provide stability and reduce strain on your knees.
- Water Filter: A reliable water filter like the Sawyer Squeeze is crucial for purifying water from streams and lakes.
- Warm Layers: Pack plenty of warm layers, including fleece jackets, down jackets, and thermal underwear.
- Waterproof Gear: Be prepared for rain and snow. Bring a waterproof jacket, pants, and backpack cover.
Staying Healthy: Dealing with Altitude Sickness and Other Concerns
Altitude sickness is not the only health concern on the Huayhuash.
- Altitude Sickness: Be aware of the symptoms of altitude sickness and know how to treat them.
- Traveler's Diarrhea: Take precautions to avoid traveler's diarrhea, such as drinking purified water and avoiding street food.
- Sun Protection: Protect yourself from the strong sun with sunscreen, sunglasses, and a hat.
- First-Aid Kit: Carry a comprehensive first-aid kit with medications for altitude sickness, diarrhea, pain relief, and wound care.
Respecting the Land: Minimizing Environmental Impact and Local Communities
Trekking in the Huayhuash offers a unique opportunity to connect with nature and local culture.
- Leave No Trace: Practice "leave no trace" principles to minimize your environmental impact. Pack out all trash, stay on established trails, and avoid disturbing wildlife.
- Respect Local Communities: Be respectful of local customs and traditions. Ask permission before taking photos of people or their property.
- Support Local Businesses: Hire local guides and porters, and purchase goods and services from local communities. This helps to support the local economy.
- Dispose of Waste Properly: Bury human waste in a cathole at least 200 feet from water sources and trails. Pack out all trash.